In WordPress, Contact Form 7 is a popular plugin used to create forms. Although it is commonly used to communicate with site owners, it can also be used to streamline content creation workflows. One such application is to upload posts directly to Custom Post Type (CPT) through Contact Form 7 submissions. In this guide, we will walk you through the process step by step.
Table of Contents
Step 1: Setting up a custom post type
Before integrating Contact Form 7 with custom post types, you need to set up a custom post type on your WordPress website. If you haven’t created one yet, check out our detailed guide on how to create a custom post type in WordPress using code. Make sure you record the important details like post type slug and associated custom fields.
Step 2: Installing and Configuring Contact Form 7
If you haven’t already installed the Contact Form 7 plugin, you can do so by going to your WordPress dashboard, clicking “Plugins” > “Add New” and searching for “Contact Form 7”. Install and activate the plugin. Once activated, go to the Contact Form 7 Settings page and create a new form or use an existing one.
Step 3: Configuring Contact Form 7 Submission
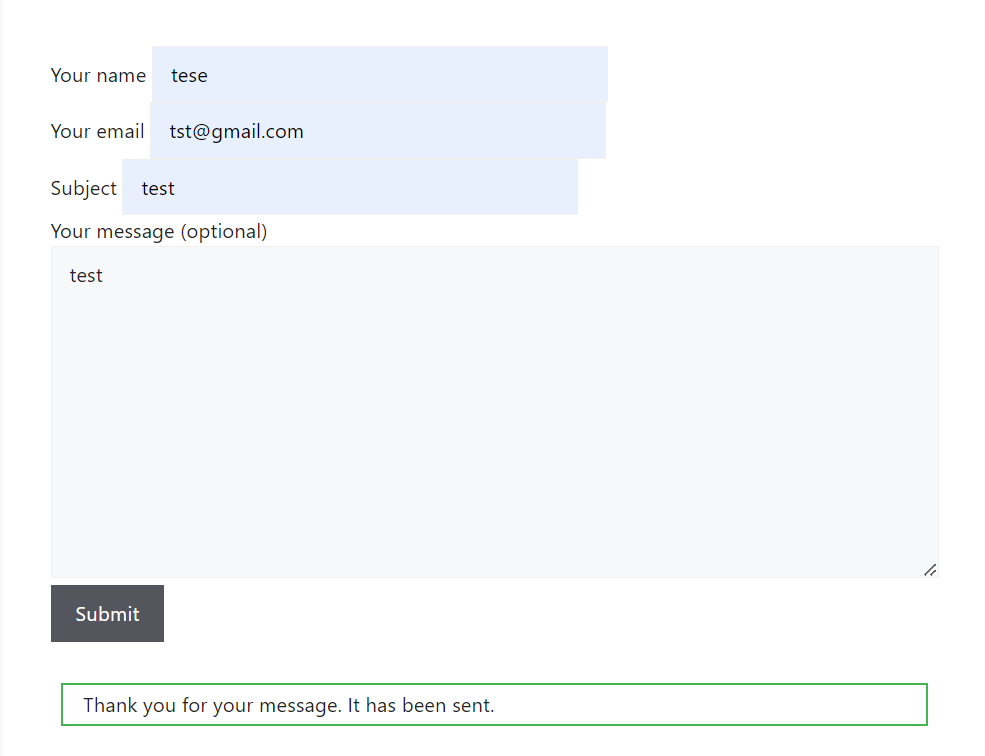
Within Contact Form 7, you need to configure the form fields to match the fields of your custom post type. For example, if your custom post type contains fields such as title, content, and custom fields, make sure your Contact Form 7 form captures this data. You can define these fields using simple HTML tags or Contact Form 7 tags.
Step 4: Writing Integration Code
Now comes the important part – writing the integration code. WordPress provides hooks that allow you to perform actions before and after certain events. We will use the wpcf7_before_send_mail hook to capture the form submission and create/update the custom post type accordingly. Below is the code snippet you need:
add_action('wpcf7_before_send_mail', 'create_draft_post_with_cf7_data');
function create_draft_post_with_cf7_data($contact_form) {
if ($contact_form->id() == YOUR_CONTACT_FORM_ID) {
$submission = WPCF7_Submission::get_instance();
if ($submission) {
$posted_data = $submission->get_posted_data();
$post_id = wp_insert_post(array(
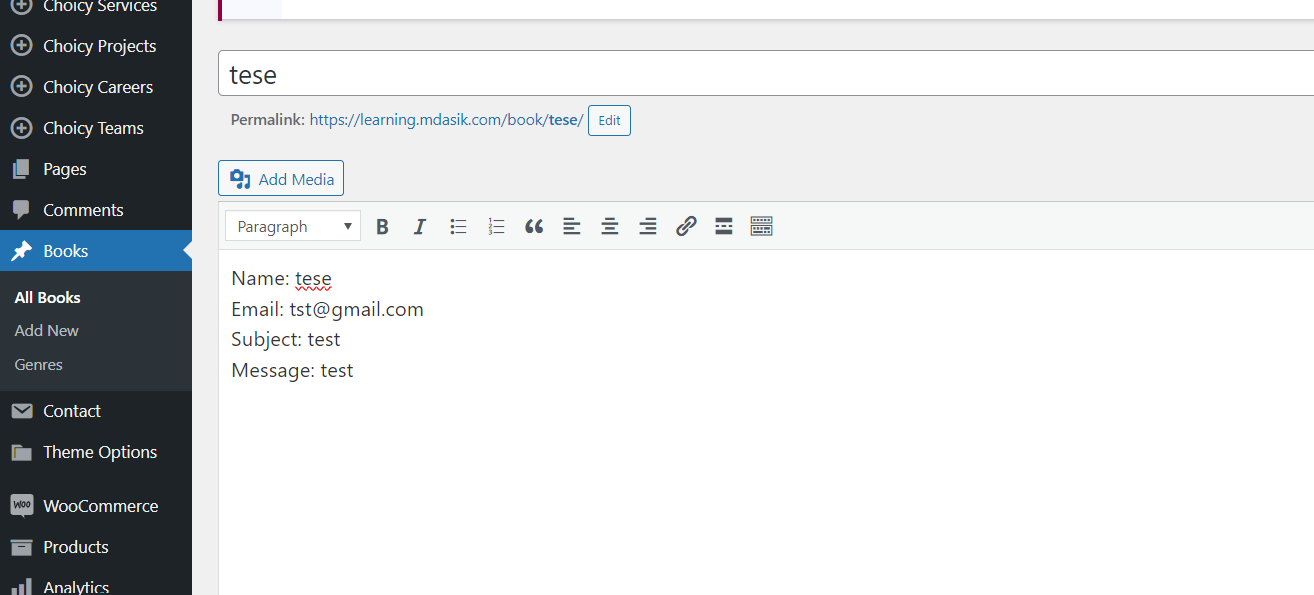
'post_title' => $posted_data['your-name'],
'post_content' => "Name: {$posted_data['your-name']}\nEmail: {$posted_data['your-email']}\nSubject: {$posted_data['your-subject']}\nMessage: {$posted_data['your-message']}",
'post_type' => 'your_custom_post_type',
'post_status' => 'draft',
));
if (!is_wp_error($post_id)) {
update_post_meta($post_id, 'your_custom_field_1', $posted_data['your-name']);
update_post_meta($post_id, 'your_custom_field_2', $posted_data['your-email']);
update_post_meta($post_id, 'your_custom_field_3', $posted_data['your-subject']);
update_post_meta($post_id, 'your_custom_field_4', $posted_data['your-message']);
}
}
}
}
Ensure to replace YOUR_CONTACT_FORM_ID with the ID of your Contact Form 7 form and 'your_custom_post_type' with the slug of your custom post type. This code will create a new post in draft status whenever the specified Contact Form 7 form is submitted.
Code Explanation:
add_action(‘wpcf7_before_send_mail’, ‘create_draft_post_with_cf7_data’);
This line adds an action hook to the wpcf7_before_send_mail event. It means that when Contact Form 7 is about to send mail, it will execute the function create_draft_post_with_cf7_data.
function create_draft_post_with_cf7_data($contact_form) {
This defines the function create_draft_post_with_cf7_data, which will be executed when the wpcf7_before_send_mail event is triggered. It takes $contact_form as a parameter, which represents the Contact Form 7 form object.
if ($contact_form->id() == YOUR_CONTACT_FORM_ID) {
This condition checks if the ID of the submitted form matches the ID of the Contact Form 7 form you want to target. Replace YOUR_CONTACT_FORM_ID with the ID of your specific Contact Form 7 form
$submission = WPCF7_Submission::get_instance();
This line retrieves the submission object for the current form submission.
$posted_data = $submission->get_posted_data();
This retrieves the posted data from the form submission.
$post_id = wp_insert_post(array(…
…));
This code creates a new post using wp_insert_post() function. It sets the post title to the value of ‘your-name’ field from the form submission. The post content includes details like Name, Email, Subject, and Message extracted from the form submission. Replace 'your_custom_post_type' with the slug of your custom post type. The post is set to be in draft status.
if (!is_wp_error($post_id)) {
update_post_meta($post_id, ‘your_custom_field_1’, $posted_data[‘your-name’]);
}
This block of code checks if the post was successfully created. If it was, it updates the post meta data with custom fields extracted from the form submission. Each field is associated with its corresponding meta key. If you don’t have custom fields, you can neglect this part.
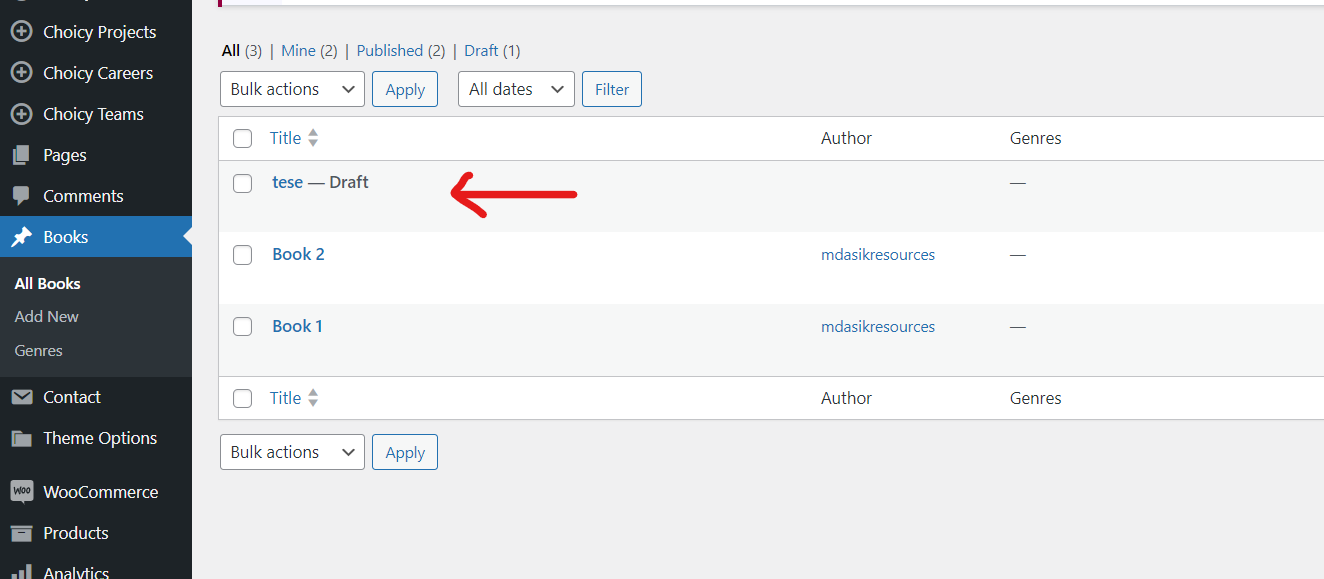
Note: I have used a default contact form 7 field, stores them in the editor section. The above is basic code to add post in the cpt. You can customize the code as you want. If you are using ACF fields, go with update_post_meta
Step 5: Testing and Deployment:
Once you’ve integrated Contact Form 7 with your custom post type, it’s crucial to thoroughly test the functionality. Submit test entries through the form to ensure that posts are created correctly with the submitted data. Once satisfied with the results, deploy the integration on your live website.
Conclusion
Integrating Contact Form 7 with a custom post type can significantly streamline content creation processes on your WordPress website. By following the steps outlined in this guide and leveraging the provided code snippet, you can seamlessly upload posts directly from Contact Form 7 submissions into your custom post type. Experiment with different form fields and post types to tailor the integration to your specific requirements.
I hope this article helped you to learn How to upload post in your custom post type from contact form 7. If you have any doubts or problem with the code, comment below to find the solutions. Also share this blog if you find this useful.
Want to build professional website for your Business or Store, Get a free quote here
Click here to get Premium Plugins and Themes at rs.249. Get 20% Off on your first order “WELCOME20”


