AJAX (Asynchronous JavaScript and XML) is a web development technology that allows web pages to dynamically update content without reloading the entire page. Implementing AJAX search in WordPress can greatly enhance the user experience by providing real-time search results without the need to refresh the page. In this article, we’ll explore the importance of AJAX search in improving user experience and walk through the steps to implement AJAX search in WordPress.
Table of Contents
Learn about AJAX in WordPress
What is AJAX and how does it work?
AJAX is a combination of technologies such as JavaScript, XML, and more recently JSON. It allows the browser to send and receive data asynchronously from a web server without interfering with the display and behavior of existing pages. In a WordPress environment, AJAX can be used to create real-time search capabilities, where search results are displayed immediately as the user enters a query.
Benefits of using AJAX to implement search functionality
There are several benefits to using AJAX in WordPress search functionality. It provides users with instant search results, improving the overall user experience by saving time and reducing frustration. In addition, AJAX searches can help increase user engagement and retention on your site by making your site more interactive and responsive.
Limitations and considerations when implementing AJAX searches in WordPress
While AJAX searching can enhance user experience, there are some limitations and considerations to keep in mind when implementing it in WordPress. Some of these include potential conflicts with caching plugins, the need to securely handle search queries, and ensuring compatibility with various WordPress themes and plugins.
Methods to implement AJAX search in WordPress
- Using Plugin
- Using Code
Using Plugin
Install the AJAX search plug-in: First install the WordPress plug-in that enables AJAX search functionality. There are several options available, such as “Ajax Search Lite“, “Ajax Search Pro” or “SearchWP Live Ajax Search“. Choose a plugin that suits your needs and install it on your WordPress site.
Enable Plugin: After installing the plugin, enable it on your WordPress website. This will enable AJAX search functionality and allow you to customize search settings to your liking.
Configure search settings: Customize the search settings in the plugin to match the design and functionality of your website. You can choose to see search results instantly, enable autocomplete suggestions, or customize the look of your search bar.
Test the AJAX search functionality: After configuring the search settings, test the AJAX search functionality on your WordPress site. Run search queries and ensure results are displayed instantly and accurately.
Optimize Search Performance: Monitor the performance of AJAX searches on your WordPress site and make any necessary optimizations to ensure fast, seamless search functionality. Consider optimizing search queries, caching search results, or implementing lazy loading for better performance.
Collect user feedback: Collect user feedback on the AJAX search function to identify areas for improvement. Use this feedback to enhance your search experience and make adjustments as needed.
Video Tutorial
Using Code
Step 1: Enqueue Scripts
The first step in adding AJAX search to your WordPress site is to enqueue the necessary scripts. This includes jQuery and your custom JavaScript file. Add the following code to your theme’s functions.php file:
					function custom_enqueue_scripts() {
    wp_enqueue_script('jquery');
    wp_enqueue_script('custom-ajax-search', get_template_directory_uri() . '/js/custom-ajax-search.js', array('jquery'), null, true);
    wp_localize_script('custom-ajax-search', 'ajax_search_params', array(
        'ajax_url' => admin_url('admin-ajax.php')
    ));
}
add_action('wp_enqueue_scripts', 'custom_enqueue_scripts');
Explanation:
wp_enqueue_script('jquery'): This function ensures that jQuery is loaded on your site.wp_enqueue_script('custom-ajax-search'): This function enqueues your custom JavaScript file,custom-ajax-search.js.wp_localize_script: This function passes the AJAX URL to your JavaScript file, making it accessible throughajax_search_params.ajax_url.
Step 2: Create JavaScript for AJAX Request
Next, you need to create the JavaScript file that will handle the AJAX request. Create a file named custom-ajax-search.js in your theme’s js directory and add the following code:
					jQuery(document).ready(function($) {
    $('#search-input').on('input', function() {
        var searchQuery = $(this).val();

        if (searchQuery.length > 2) { // Minimum 3 characters to start searching
            $.ajax({
                url: ajax_search_params.ajax_url,
                type: 'POST',
                data: {
                    action: 'ajax_search',
                    query: searchQuery
                },
                success: function(response) {
                    $('#search-results').html(response);
                }
            });
        } else {
            $('#search-results').empty();
        }

        $('#clear-search').toggle(searchQuery.length > 0); // Show/hide close icon
    });

    $('#clear-search').on('click', function() {
        $('#search-input').val('').focus();
        $('#search-results').empty();
        $(this).hide(); // Hide the close icon
    });

    $(document).on('click', '.search-result-item', function() {
        window.location.href = $(this).data('url');
    });
});
Explanation:
$('#search-input').on('input', function() { ... }): This sets up an event listener for input events on the search bar.if (searchQuery.length > 2): Only perform the search if the input length is greater than 2 characters.$.ajax({ ... }): Sends an AJAX POST request to the server with the search query.url: ajax_search_params.ajax_url: Uses the AJAX URL passed fromwp_localize_script.data: { action: 'ajax_search', query: searchQuery }: Sends the action ‘ajax_search’ and the search query to the server.success: function(response) { ... }: Updates the search results dropdown with the response from the server.
$('#clear-search').toggle(searchQuery.length > 0): Shows or hides the close icon based on whether the input field has text.$('#clear-search').on('click', function() { ... }): Clears the input field and hides the search results when the close icon is clicked.$(document).on('click', '.search-result-item', function() { ... }): Redirects the user to the selected page when a search result is clicked.
Step 3: Create the AJAX Handler in PHP
The next step is to create the AJAX handler function in PHP. This function will query the pages based on the search term and return the results. Add the following code to your theme’s functions.php file:
					function ajax_search() {
    $search_query = sanitize_text_field($_POST['query']);

    $args = array(
        'post_type' => 'page',
        's' => $search_query,
        'posts_per_page' => 10
    );

    $query = new WP_Query($args);

    if ($query->have_posts()) {
        while ($query->have_posts()) {
            $query->the_post();
            echo '<div class="search-result-item" data-url="' . get_permalink() . '">' . get_the_title() . '</div>';
        }
        wp_reset_postdata();
    } else {
        echo '<div class="search-result-item">No results found</div>';
    }

    wp_die();
}
add_action('wp_ajax_nopriv_ajax_search', 'ajax_search');
add_action('wp_ajax_ajax_search', 'ajax_search');
Explanation:
$search_query = sanitize_text_field($_POST['query']);: Sanitizes the search query to ensure it is safe to use.$args = array(...);: Creates an array of arguments for the WP_Query, specifying that you want to search pages and limit the results to 10.$query = new WP_Query($args);: Executes the query with the specified arguments.if ($query->have_posts()) { ... } else { ... }: Checks if there are any results.while ($query->have_posts()) { ... }: Loops through the results and outputs each one as a div with the classsearch-result-itemand a data attribute containing the URL.wp_reset_postdata();: Resets the global post data to ensure other queries are not affected.echo '<div class="search-result-item">No results found</div>';: Outputs a message if no results are found.
wp_die();: Terminates the AJAX request.
Note: If you want to search all the post type in your website, comment the post_type line in args array
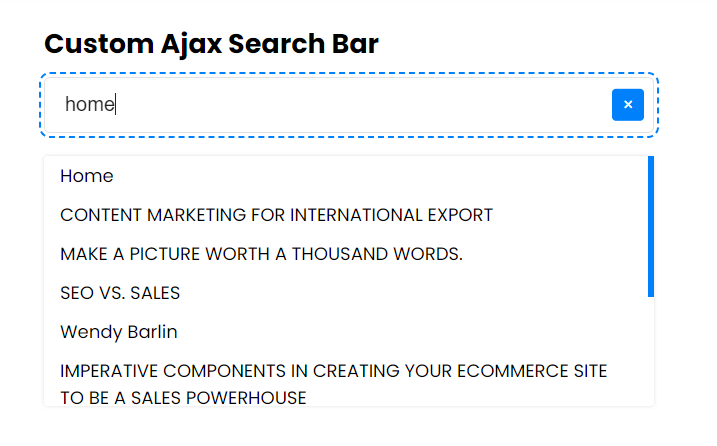
Step 4: Add the Search Bar to Your Theme
Now you need to add the search bar HTML to your theme where you want the search bar to appear. Add the following code to your template file:
					<div class="search-container">
	<h3>Custom Ajax Search Bar</h3>
    <div class="ai-search-wrap">
        <input type="text" id="search-input" placeholder="Search pages..." fdprocessedid="wq7n77">
        <span id="clear-search" class="close-icon">×</span>
        <div id="search-results" class="search-results-dropdown"></div>
    </div>
</div>
Explanation:
<div class="search-container">: This is the main container for the search bar.<h3>Custom Ajax Search Bar</h3>: A heading for the search bar.<div class="ai-search-wrap">: A wrapper for the input field and the clear icon.<input type="text" id="search-input" placeholder="Search pages...">: The search input field where users can type their queries.<span id="clear-search" class="close-icon">×</span>: A span element that acts as a clear (reset) button for the search input.<div id="search-results" class="search-results-dropdown"></div>: A container for displaying search results.
Note: If you want to add search as shortcode, use the below code, add this in your function.php or in your shortcode.php file
					function custom_ajax_search_bar() {
    ob_start();
    ?>
    <div class="search-container">
        <h3>Custom Ajax Search Bar</h3>
        <div class="ai-search-wrap">
            <input type="text" id="search-input" placeholder="Search pages..." fdprocessedid="wq7n77">
            <span id="clear-search" class="close-icon">×</span>
            <div id="search-results" class="search-results-dropdown"></div>
        </div>
    </div>
    <?php
    return ob_get_clean();
}
add_shortcode('custom_ajax_search_bar', 'custom_ajax_search_bar');
Explanation:
- Defines a function named
custom_ajax_search_bar. This function generates the HTML structure for the custom search bar. ob_start();: Starts output buffering. This means that any output generated within this function will be captured and stored in a buffer, rather than being immediately sent to the browser.return ob_get_clean();: Ends output buffering and returns the contents of the buffer. This means the HTML generated in the function is returned as a string and can be used wherever the function is called.- Registers the
custom_ajax_search_barfunction as a shortcode in WordPress. 'custom_ajax_search_bar': The shortcode tag. When[custom_ajax_search_bar]is used in a post or page, WordPress will execute thecustom_ajax_search_barfunction and insert its output in place of the shortcode.
Step 5: Add Styling to the Search Bar
Now you need to style the search bar with the below css code. Add the following code to your style file:
					.search-container {
    position: relative;
    width: 100%;
    max-width: 640px;
    margin: 0px auto;
    padding: 60px 15px 60px;
}
.search-container h3 {
    margin: 0 0 15px;
    line-height: 1.325;
}
#search-input {
    padding: 10px 40px 10px 20px;
    color: #222;
    border: 1px solid #e2e2e2;
}
#search-input::placeholder {
    color: #666;
}
.search-results-dropdown {
    background-color: rgb(255, 255, 255);
    margin-top: 3px;
    padding: 0px;
    box-shadow: rgba(0, 0, 0, 0.125) 0px 0px 4px;
    border-radius: 4px;
    overflow: hidden;
    width: 100%;
    max-height: 250px;
    overflow-y: auto;
}
.search-results-dropdown::-webkit-scrollbar {
	width: 6px;
}
.search-results-dropdown::-webkit-scrollbar-track {
	-webkit-box-shadow: inset 0 0 0px rgba(0,0,0,0.3);
	box-shadow: inset 0 0 0px rgba(0,0,0,0.3);
}
.search-results-dropdown::-webkit-scrollbar-thumb {
  background-color: var(--blue);
  outline: 0px solid slategrey;
}
.search-results-dropdown .search-result-item {
    display: block;
}
.search-results-dropdown .search-result-item a {
    display: block;
    padding: 6px 16px 6px;
}
.search-results-dropdown .search-result-item a:hover {
    background: rgba(0, 128, 251, 0.2);
}
.ai-search-wrap{
    position: relative;
}
.ai-search-wrap .close-icon {
    position: absolute;
    right: 10px;
    top: 15px;
    transform: translateY(-10%);
    cursor: pointer;
    font-size: 18px;
    display: none;
    width: 32px;
    height: 32px;
    text-align: center;
    line-height: 32px;
    background: var(--blue);
    color: var(--white);
    border-radius: 4px;
}
.search-container input:focus + .close-icon,
.search-container input:not(:placeholder-shown) + .close-icon {
    display: block; /* Show the icon when input is focused or has text */
}
.search-results-dropdown .search-result-item span.no-result {
    display: block;
    padding: 8px 20px;
    background: #fff;
    color: #e24d4d;
}
Explanation:
<div class="search-container"> ... </div>: This div contains the search input, close icon, and search results dropdown..search-container: Styles the main container to be centered, with a max width of 640px, and padding for spacing..search-container h3: Styles the heading with margin and line height for spacing.#search-input: Adds padding inside the input field, sets text color and border.#search-input::placeholder: Styles the placeholder text inside the input field..search-results-dropdown: Styles the dropdown for search results with background color, margin, padding, shadow, rounded corners, and scrollbar..search-results-dropdown::-webkit-scrollbar: Customizes the scrollbar width..search-results-dropdown::-webkit-scrollbar-track: Adds shadow inside the scrollbar track..search-results-dropdown::-webkit-scrollbar-thumb: Colors the scrollbar thumb..search-result-item: Makes each search result item a block element..search-result-item a: Styles links within search result items with padding..search-result-item a:hover: Adds a hover effect to search result links.ai-search-wrap: Positions the wrapper relative to contain absolutely positioned elements within it..close-icon: Styles the close (reset) button with position, cursor pointer, font size, dimensions, text alignment, background color, text color, and rounded corners.:focus :This rule ensures the close icon is shown when the input field is focused or when it contains text..no-result: Styles the no-result message with padding, background color, and text color.
Conclusion
Implementing an AJAX search in WordPress is a great way to enhance the user experience on your website. With AJAX search, users can see search results as they type, making it quicker and easier for them to find what they are looking for. By following the steps in this guide, you can add an AJAX search bar to your WordPress site that dynamically displays page results in a dropdown and allows users to navigate to the selected page. This feature can significantly improve the usability of your site, especially if you have a lot of content.
Adding a close icon to clear the search input further enhances the user experience by making it easy for users to start a new search. The combination of these features makes your search functionality more interactive and user-friendly.
I hope this guide helps you implement AJAX search on your WordPress site. If you have any doubts or problem with the code, comment below to find the solutions. Also share this blog if you find this useful.
Want to build professional website for your Business or Store, Get a free quote here
Click here to get Premium Plugins and Themes at rs.249. Get 20% Off on your first order “WELCOME20”