Owl Carousel is a popular jQuery plugin for creating responsive and customizable image and content sliders on your website. A common requirement is to play a video once on the first slide and then automatically switch to autoplay mode for the rest of the slider images. In this article, we will discuss how to achieve this functionality using Owl Carousel and provide a step-by-step guide with detailed code explanations to help you implement it( owl carousel slide to next slide after video complete ).
Question from Stackoverflow:
My problem is owl carousal using home slider, images and including video also. So we need first slider it’s video playing, video time duration is (60sec+). Once finish this video slider, then automatically start the remaining slider images.
Owl carousal first slide video once finished then start the remaining slider images autoplay
Table of Contents
Building an owl carousel
Before we get into the code, make sure you’ve added Owl Carousel to your webpage. You can download it from the Owl Carousel website or use a CDN to add the necessary CSS and JavaScript files. Here is a basic setup:
					<!DOCTYPE html>
<html>
<head>
    <link rel="stylesheet" href="path-to-your-owl-carousel/owl.carousel.min.css">
    <script src="path-to-your-owl-carousel/jquery.min.js" defer></script>
    <script src="path-to-your-owl-carousel/owl.carousel.min.js" defer></script>
</head>
<body>
    <div class="owl-carousel">
        <!-- Your slides go here -->
    </div>

    <script>window.addEventListener('DOMContentLoaded', function() {
        $(document).ready(function() {
            $(".owl-carousel").owlCarousel({
                items: 1, // Set the number of items to 1 for single-slide mode
                autoplay: false, // Disable autoplay
                autoplayTimeout: 5000, // Set the autoplay interval in milliseconds (e.g., 5 seconds)
            });
        });
    });</script>
<script>class RocketElementorAnimation{constructor(){this.deviceMode=document.createElement("span"),this.deviceMode.id="elementor-device-mode",this.deviceMode.setAttribute("class","elementor-screen-only"),document.body.appendChild(this.deviceMode)}_detectAnimations(){let t=getComputedStyle(this.deviceMode,":after").content.replace(/"/g,"");this.animationSettingKeys=this._listAnimationSettingsKeys(t),document.querySelectorAll(".elementor-invisible[data-settings]").forEach(t=>{const e=t.getBoundingClientRect();if(e.bottom>=0&&e.top<=window.innerHeight)try{this._animateElement(t)}catch(t){}})}_animateElement(t){const e=JSON.parse(t.dataset.settings),i=e._animation_delay||e.animation_delay||0,n=e[this.animationSettingKeys.find(t=>e[t])];if("none"===n)return void t.classList.remove("elementor-invisible");t.classList.remove(n),this.currentAnimation&&t.classList.remove(this.currentAnimation),this.currentAnimation=n;let s=setTimeout(()=>{t.classList.remove("elementor-invisible"),t.classList.add("animated",n),this._removeAnimationSettings(t,e)},i);window.addEventListener("rocket-startLoading",function(){clearTimeout(s)})}_listAnimationSettingsKeys(t="mobile"){const e=[""];switch(t){case"mobile":e.unshift("_mobile");case"tablet":e.unshift("_tablet");case"desktop":e.unshift("_desktop")}const i=[];return["animation","_animation"].forEach(t=>{e.forEach(e=>{i.push(t+e)})}),i}_removeAnimationSettings(t,e){this._listAnimationSettingsKeys().forEach(t=>delete e[t]),t.dataset.settings=JSON.stringify(e)}static run(){const t=new RocketElementorAnimation;requestAnimationFrame(t._detectAnimations.bind(t))}}document.addEventListener("DOMContentLoaded",RocketElementorAnimation.run);</script></body>
</html>
Step 1: HTML Structure
The HTML code sets up the structure for the Owl Carousel and its slides, which can contain both videos and images.
					<div class="owl-carousel">
    <div class="item video-slide">
        <video class="slider-video" width="100%" height="100%" autoplay muted>
            <source src="your-video.mp4" type="video/mp4">
        </video>
    </div>
    <div class="item">
        <img decoding="async" src="your-image-1.jpg" alt="Image 1" title="Owl Carousel Slide to Next Slide after video Complete">
    </div>
    <div class="item">
        <img decoding="async" src="your-image-2.jpg" alt="Image 2" title="Owl Carousel Slide to Next Slide after video Complete">
    </div>
    <!-- Add more video and image slides as needed -->
</div>
Explanation:
- This structure includes a video slide as the first item and image slides afterward.
- The
<video>element contains the video to be played. Replace"your-video.mp4"with the actual path to your video file. - The subsequent slides are image slides, each with its respective image source.
Step 2: CSS Styling
This section provides basic CSS styling for the Owl Carousel and its slides.
    .owl-carousel {
        margin-bottom: 20px;
    }

    .owl-carousel .item {
        text-align: center;
    }

    .video-slide {
        position: relative;
        padding-bottom: 56.25%; /* 16:9 aspect ratio for video */
    }

    .video-slide video {
        position: absolute;
        top: 0;
        left: 0;
        width: 100%;
        height: 100%;
    }
Explanation:
- The CSS code ensures that the carousel and its slides are styled properly.
- The
video-slideclass is used to create a responsive video container with a 16:9 aspect ratio.
Step 3: JavaScript Initialization
In this part, the Owl Carousel is initialized with various options.
$(document).ready(function () {
        var owl = $(".owl-carousel").owlCarousel({
            items: 1,               // Number of items to show (1 for single-slide mode)
            autoplay: false,        // Disable Owl Carousel autoplay initially
            loop: false,            // Disable looping
            animateOut: 'fadeOut',  // Use a fade-out animation
            smartSpeed: 1000,       // Set the speed of transitions
            autoplayTimeout: 8000, // Set the autoplay timeout to 8 seconds
            autoplaySpeed: 8000,   // Set the speed of autoplay to 8 seconds
            margin: 0,              // Set the margin between items
            dots: true,             // Show navigation dots
            dotsClass: 'hero-dots'  // Define the class for navigation dots
        });
Explanation:
The Owl Carousel is initialized with options:
items: 1ensures that only one slide is visible at a time (single-slide mode).autoplay: falseinitially disables autoplay.loop: falseprevents looping, so the carousel stops after all slides.animateOut: 'fadeOut'applies a fade-out transition effect.smartSpeed: 1000sets the transition speed to 1000 milliseconds (1 second).autoplayTimeout: 8000sets the autoplay timeout to 8 seconds.autoplaySpeed: 8000controls the speed of autoplay.margin: 0sets the margin between items to 0.dots: trueshows navigation dots, anddotsClassdefines a custom class for them.
Step 4: Handling Video Playback and Autoplay
					        // Get all video slides
        var videoSlides = owl.find('.video-slide video');

        // Function to play the next slide when a video ends
        function playNextSlide() {
            owl.trigger('next.owl.carousel');
        }

        // Listen for the 'ended' event of all video slides
        videoSlides.on('ended', playNextSlide);
Explanation:
- This part identifies video slides and sets up a function to play the next slide when a video ends.
- It listens for the ‘ended’ event on each video element, and when a video ends, it triggers the
playNextSlidefunction to move to the next slide.
Step 5: Handling Slide Change Events
					        // Function to manually trigger the next slide after a fixed duration
        function playNextSlideAfterDuration(duration) {
            setTimeout(function () {
                owl.trigger('next.owl.carousel');
            }, duration);
        }

        // Listen for Owl Carousel slide change events
        owl.on('changed.owl.carousel', function (event) {
            var currentSlide = event.item.index;
            var currentSlideType = owl.find('.owl-item').eq(currentSlide).find('.video-slide').length > 0;

            if (currentSlideType) {
                owl.trigger('stop.owl.autoplay'); // Disable autoplay for video slide
            } else {
                playNextSlideAfterDuration(5000); // Enable autoplay for image slides after 5 seconds
            }
        });
    });
</script>
Explanation:
- This section defines the
playNextSlideAfterDurationfunction to manually trigger the next slide after a specified duration (5 seconds in this case). - It listens for Owl Carousel slide change events and checks whether the current slide is a video slide or an image slide.
- For video slides, it disables autoplay. For image slides, it enables autoplay after a 5-second delay.
By following these steps and understanding the provided code, you can implement an Owl Carousel with specific behavior for video and image slides. Make sure to replace the placeholder URLs with your actual video and image sources, and customize the options and timing according to your requirements.
Owl Carousel Slide to Next Slide after video Complete (Full Code)
					<!DOCTYPE html>
<html lang="en">
<head>

    <meta name="viewport" content="width=device-width, initial-scale=1.0">
    <title>Owl Carousel Video Autoplay</title>
    <!-- Include jQuery and Owl Carousel -->
    <link data-minify="1" rel="stylesheet" href="https://mdasik.com/wp-content/cache/min/1/ajax/libs/OwlCarousel2/2.3.4/assets/owl.carousel.min.css?ver=1782752283">
    <script data-minify="1" src="https://mdasik.com/wp-content/cache/min/1/jquery-3.6.0.min.js?ver=1782752283" defer></script>
    <script data-minify="1" src="https://mdasik.com/wp-content/cache/min/1/ajax/libs/OwlCarousel2/2.3.4/owl.carousel.min.js?ver=1782752283" defer></script>
</head>
<body>


<div class="owl-carousel">
    <div class="item video-slide">
        <video class="slider-video" width="100%" height="100%" autoplay muted>
            <source src="your-video.mp4" type="video/mp4">
        </video>
    </div>
    <div class="item">
        <img decoding="async" src="your-image-1.jpg" alt="Image 1" title="Owl Carousel Slide to Next Slide after video Complete">
    </div>
    <div class="item">
        <img decoding="async" src="your-image-2.jpg" alt="Image 2" title="Owl Carousel Slide to Next Slide after video Complete">
    </div>
    <!-- Add more video and image slides as needed -->
</div>

<style>
    .owl-carousel {
        margin-bottom: 20px;
    }

    .owl-carousel .item {
        text-align: center;
    }

    .video-slide {
        position: relative;
        padding-bottom: 56.25%; /* 16:9 aspect ratio for video */
    }

    .video-slide video {
        position: absolute;
        top: 0;
        left: 0;
        width: 100%;
        height: 100%;
    }
</style>

<script>window.addEventListener('DOMContentLoaded', function() {
$(document).ready(function () {
        var owl = $(".owl-carousel").owlCarousel({
            items: 1,
            autoplay: false, // Disable Owl Carousel autoplay initially
            loop: false,
            animateOut: 'fadeOut',
            smartSpeed: 1000,
            autoplayTimeout: 8000,
  			autoplaySpeed: 8000,
  			margin: 0,
  			dots: true,
  			dotsClass: 'hero-dots'
        });

        // Get all video slides
        var videoSlides = owl.find('.video-slide video');

        // Function to play the next slide when a video ends
        function playNextSlide() {
            owl.trigger('next.owl.carousel');
        }

        // Listen for the 'ended' event of all video slides
        videoSlides.on('ended', playNextSlide);
		// Function to manually trigger the next slide after a fixed duration
    function playNextSlideAfterDuration(duration) {
        setTimeout(function () {
            owl.trigger('next.owl.carousel');
        }, duration);
    }

        // Listen for Owl Carousel slide change events
        owl.on('changed.owl.carousel', function (event) {
            var currentSlide = event.item.index;
            var currentSlideType = owl.find('.owl-item').eq(currentSlide).find('.video-slide').length > 0;

            // If the current slide is a video slide, disable autoplay
            if (currentSlideType) {
                owl.trigger('stop.owl.autoplay');
            } else {
                // If it's an image slide, enable autoplay
               // owl.trigger('play.owl.autoplay');
               playNextSlideAfterDuration(5000);
            }
        });
    });
});</script>

</body>
</html>
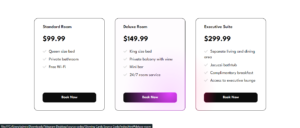
Output:
Conclusion
In this article, we’ve shown you how to create an owl carousel that plays a video on the first slide and autoplays for the rest of the slides. By following the steps outlined and understanding the code changes, you can improve your website’s user experience by seamlessly integrating videos into your sliders. Feel free to further customize the code to fit your specific needs and design preferences.
I hope this article helped you to learn How to slide Owl Carousel to Next Slide after video Complete. If you have any doubts or problem with the code, comment below to find the solutions. Also share this blog if you find this useful.
Want to build professional website for your Business or Store, Get a free quote here
Click here to get Premium Plugins and Themes at rs.249. Get 20% Off on your first order “WELCOME20”