In this blog post, we’ll explore how to enhance your Elementor-powered WordPress sites with custom styles and scripts. Whether you want to add unique design elements or add interactive features, these code snippets can help improve the functionality and aesthetics of your site.
We’ll share practical examples and step-by-step tutorials from our YouTube channel, covering a range of customization techniques. From adding custom CSS for unique styling to integrating JavaScript for advanced interactions, you’ll learn how to use code to create a more dynamic and engaging website.
Join us as we explore these techniques and get ready to make your Elementor designs truly outstanding!
Table of Contents
Custom Footer in WordPress Elementor
Elementor allows users to design custom footers for their WordPress websites using its drag-and-drop interface. A custom footer can include various elements such as menus, social media icons, contact information, and more. By using custom CSS, as in the example provided, users can further enhance the appearance and behavior of elements in the footer.
In this case, CSS enhances the user experience by adding subtle visual feedback when hovering over menu links in the footer. This type of interaction is a small but effective way to improve the aesthetics and usability of a website, making it more responsive and engaging for visitors.
					.footer-menu ul li a:hover {
    padding-left: 15px;
    transition: all 0.3s ease;
}
Selector: .footer-menu ul li a:hover
- This selector targets anchor (
<a>) elements within list items (<li>) inside an unordered list (<ul>), which in turn is within an element with the classfooter-menu. - The
:hoverpseudo-class specifies that the styles should only apply when a user hovers over these anchor elements.
Property: padding-left: 15px;
- This adds 15 pixels of padding to the left side of the anchor element. This padding effectively pushes the content inside the link to the right, creating a visual indentation effect when hovered over.
Property: transition: all 0.3s ease;
- This property specifies a smooth transition effect for the padding change.
allindicates that the transition should apply to all properties that change.0.3ssets the duration of the transition to 0.3 seconds.easedefines the timing function, which starts slow, speeds up in the middle, and slows down at the end, providing a smooth and natural effect.
Infinite Smooth Image Scrolling
The concept of infinite smooth image scrolling involves continuously cycling through a set of images, often with a seamless transition. This technique is popular in web design for showcasing multiple images or products in a visually appealing and user-friendly manner.
					.infinte-img-scroll .swiper-wrapper {
      -webkit-transition-timing-function: linear !important;
      -moz-transition-timing-function: linear !important;
      -o-transition-timing-function: linear !important;
      transition-timing-function: linear !important;
}

/*Use below code For same Height*/
.infinte-img-scroll figure.swiper-slide-inner img {
    height: 250px;
    object-fit: cover;
}

/*Use below code to show title on hover*/
.infinte-img-scroll figure.swiper-slide-inner figcaption {
    position: absolute;
    top: 50%;
    right: 0;
    left: 0;
    z-index: 2;
    visibility: hidden;
}
.infinte-img-scroll figure.swiper-slide-inner:before {
    content: '';
    position: absolute;
    width: 100%;
    height: 100%;
    background: black;
    border-radius:8px;
    opacity: 0.4;
    z-index: 1;
    visibility: hidden;
}
.infinte-img-scroll figure.swiper-slide-inner:hover:before, .infinte-img-scroll figure.swiper-slide-inner:hover figcaption{visibility:visible;}
CSS Class: .infinte-img-scroll .swiper-wrapper
transition-timing-function: linear: This property ensures that the transition effect (scrolling in this case) occurs at a constant speed, giving it a smooth appearance. The!importantdeclaration ensures that this style takes precedence over any other conflicting styles.
CSS Class: .infinte-img-scroll figure.swiper-slide-inner img
height: 250px: Sets the height of the images within the slides to 250 pixels.object-fit: cover: Ensures that the images cover the entire container without distorting the aspect ratio, even if it means cropping the image.
CSS Class: .infinte-img-scroll figure.swiper-slide-inner figcaption
position: absolute: Positions the caption absolutely within the figure, allowing precise control over its placement.top: 50%; right: 0; left: 0;: Centers the caption horizontally and vertically within the figure.z-index: 2: Ensures the caption appears above other elements within the same stacking context.visibility: hidden: Initially hides the caption, making it visible only on hover.
CSS Class: .infinte-img-scroll figure.swiper-slide-inner:before
content: '': Creates a pseudo-element before the content of the figure.position: absolute; width: 100%; height: 100%: Positions the pseudo-element absolutely, covering the entire figure.background: black; opacity: 0.4: Adds a semi-transparent black overlay on the image.z-index: 1: Places this overlay below the figcaption but above the image.visibility: hidden: Initially hides this overlay, making it visible only on hover.
Hover Effect
.infinte-img-scroll figure.swiper-slide-inner:hover:beforeand.infinte-img-scroll figure.swiper-slide-inner:hover figcaption: When the figure is hovered over, the overlay and the caption become visible, providing a visual cue that the image can be interacted with.
Banner Slider in Elementor Using Prime Slider Plugin
A banner slider is a dynamic and visually appealing way to display banners, images or other promotional content on a website. In Elementor, using plugins like Prime Slider, users can create advanced sliders with various customization options.
The provided CSS code is typically used to add a dark overlay over the images in the banner slider. This overlay helps improve the visibility of text or other elements placed over images, creating a contrast that improves readability and visual appeal. A semi-transparent overlay also adds a stylish effect, which is used in modern web design to make content more engaging and beautiful.
Prime Slider, as a plugin, offers a variety of pre-designed templates and customization options that allow users to create responsive and interactive sliders without the need for extensive coding knowledge. The use of custom CSS allows you to further customize and fine-tune the appearance of the slider to match the design and branding of the website, as in the example provided.
					/*Use this Code to Add Overlay for background image*/
.bdt-ps-slide-img:before {
    content: '';
    width: 100%;
    height: 100%;
    background: black;
    opacity: 0.6;
    position: absolute;
}

/*Use this Code to Change Button Icon*/
span.bdt-slide-btn-icon svg {
    display: none;
}
span.bdt-slide-btn-icon:before {
    content: '';
    position: absolute;
    width: 30px;
    height: 30px;
    background-size:30px;
    background-image: url('');
    background-position: center;
    background-repeat: no-repeat;
}

/*Use this Code to Change Button Icon on button hover*/
a.bdt-slide-btn:hover span.bdt-slide-btn-icon:before {

    background-image: url('');
    background-position: center;
    background-repeat: no-repeat;

}
Selector: .bdt-ps-slide-img:before
- This selector targets a pseudo-element (
:before) that is created before the content of elements with the classbdt-ps-slide-img. - The class
bdt-ps-slide-imgis likely used to style the image container within a slide, where “bdt” could refer to a specific naming convention or framework used by Prime Slider.
Property: content: '';
- This property creates an empty pseudo-element. The
contentproperty is necessary for the pseudo-element to render, even if it’s empty.
Property: width: 100%; height: 100%;
- These properties make the pseudo-element cover the entire width and height of the parent element (i.e., the image container). This ensures that the overlay spans the full size of the image.
Property: background: black;
- This sets the background color of the pseudo-element to black.
Property: opacity: 0.6;
- This sets the opacity of the pseudo-element to 0.6, making it semi-transparent. This allows the image underneath to be partially visible, creating a darkening effect.
Property: position: absolute;
- This positions the pseudo-element absolutely within the parent container, which means it will be positioned relative to the nearest positioned ancestor. In this case, it’s used to overlay the entire image container.
Selector: span.bdt-slide-btn-icon svg
- This target the icon element and ‘display:none;’ will remove/hide the svg element or icon which comes by default in prime slider.
Selector: span.bdt-slide-btn-icon:before
- This targets a pseudo-element (
:before) that is created before the content of aspanelement with the classbdt-slide-btn-icon.
- This targets a pseudo-element (
Property: content: '';
- Creates an empty pseudo-element. The
contentproperty must be defined for the pseudo-element to render.
- Creates an empty pseudo-element. The
Property: position: absolute;
- Positions the pseudo-element absolutely within its parent element, allowing it to be placed precisely where needed.
Property: width: 30px; height: 30px;
- Sets the size of the pseudo-element to 30×30 pixels.
Property: background-size: 30px;
- Ensures the background image fits within the 30×30 pixel area.
Property: background-image: url('');
- This is where the URL of the custom icon image is placed. Currently, it is empty and should be filled with the path to the desired icon image.
Property: background-position: center;
- Centers the background image within the pseudo-element.
Property: background-repeat: no-repeat;
- Ensures the background image does not repeat and is displayed only once within the pseudo-element.
Elementor Mobile Menu Full Screen
Elementor is a popular page builder plugin for WordPress that allows users to design and customize their websites with a drag-and-drop interface. It offers a wide range of widgets and design elements to create visually appealing and responsive layouts without the need to write code.
Elementor Menu Widget:
- Navigation Menu: The Elementor Menu widget is used to add and manage menus on your WordPress site. It gives you options to style the menu including its layout, typography, colors and more.
- Dropdown Menus: Elementor supports dropdown menus, which can be designed to display as full-screen overlays on mobile devices using custom CSS and JavaScript, just like in your example.
This system creates a full-screen menu overlay for mobile devices, ensuring navigation is accessible and visually prominent. If you need to update links or text, you need to adjust the content in the background URL and CSS respectively.
Note: Make sure to add this class in the nav menu widget ‘.header-nav-menu’ . Also make sure to change the background property url of ‘.nav-custom-before’ .
					<style>
    .header-nav-menu nav.elementor-nav-menu--dropdown.elementor-nav-menu__container {
    position: fixed !important;
    min-height: 100vh;
    top: 0 !important;
    width: 100% !important;
    left: 0 !important;
    right: auto;
    margin: 0 !important;
}

.header-nav-menu nav.elementor-nav-menu--dropdown.elementor-nav-menu__container .nav-custom-before {
    position: absolute;
    right: 30px;
    top: 15px;
    background: url(https://learning.mdasik.com/wp-content/uploads/2024/09/close-circle-svgrepo-com.svg);
    width: 30px;
    height: 30px;
    background-size: 30px;
    background-repeat: no-repeat;
    z-index: 9999;
}


.header-nav-menu nav.elementor-nav-menu--dropdown.elementor-nav-menu__container > ul {
    padding: 60px 10px;
}
</style>

<script>window.addEventListener('DOMContentLoaded', function() {
    jQuery(document).ready(function($) {

        // Select the navigation container
    var $navContainer = $('.header-nav-menu nav.elementor-nav-menu--dropdown.elementor-nav-menu__container');

    // Append a div inside the nav for the custom before effect
    $navContainer.prepend('<div class="nav-custom-before"></div>');


    // Listen for click events on the specified element
    $('.nav-custom-before').click(function() {
        $('.header-nav-menu .elementor-menu-toggle.elementor-active').removeClass('elementor-active');
    });
});
});</script>
CSS Overview:
- The CSS styles make the navigation menu appear full-screen, fixed to the top of the page, covering the entire viewport (both in height and width).
- A background image (close icon) is placed inside the navigation as an absolutely positioned element to serve as the close button.
- Padding is added to the navigation’s content (like the list of links) to ensure there’s proper spacing from the edges.
The CSS is designed to enhance user experience by turning the navigation into a full-screen overlay, making it visually dominant and accessible.
JavaScript Overview:
- The script runs once the page is fully loaded (
document.readyensures this). - It dynamically inserts a
divelement (representing the close button) inside the navigation menu usingprepend(). This ensures the close button is part of the menu but can’t be clicked unless the menu is open. - When the user clicks the close button, the JavaScript removes the
elementor-activeclass from the menu toggle button. This class is what Elementor uses to open and close menus, so removing it effectively closes the menu.
Overall Purpose:
- CSS: Makes the menu full-screen and adds a custom close button.
- JavaScript: Adds functionality to close the menu when the close button is clicked, making the menu interaction more user-friendly.
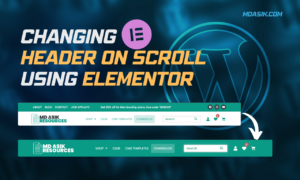
Blur Header Elementor
Elementor allows you to create a blur or glassmorphism header by using custom CSS in conjunction with Elementor’s header templates. Glassmorphism is a design style that creates a frosted glass effect, combining transparency, blurs and vivid colors.
Key Steps:
Header Template: You can create a header using Elementor’s theme builder. This theme may contain navigation, logos and other elements.
Glassomorphism effect: By using custom CSS, you can achieve classomorphism style:
- Use backdrop-filter: blur(); A property to create a blurred background.
- Add a semi-transparent background (eg rgba(255, 255, 255, 0.3)) to give it a frosted glass look.
- Add borders or shadow effects to enhance the 3D-like appearance.
    .blurheader {
    background: rgba(255, 255, 255, 0.1);
    box-shadow: 0 4px 30px rgba(0, 0, 0, 0.1);
    backdrop-filter: blur(11.2px);
    -webkit-backdrop-filter: blur(11.2px);
}
Click here to download the Header Template file
DOWNLoAD NoWYour File will download in 15 seconds...
Using a template in Elementor is a straightforward process, and it allows you to quickly design sections of your website, such as headers, footers, or entire pages. Here’s a step-by-step guide on how to use a template in Elementor:
Steps to Use a Template in Elementor:
Open Elementor Editor:
- Navigate to the page or section you want to edit.
- Click on Edit with Elementor to open the Elementor editor.
Access the Template Library:
- In the Elementor editor, click on the Folder icon in the center of the page (next to the “+” and “Add New Section” options).
- This will open the Template Library, where you can find pre-made templates, including pages, blocks, or sections.
Choose a Template:
- Browse through the available templates. You can use the tabs at the top to filter between Pages, Blocks, or saved templates.
- Preview a template by hovering over it and clicking Preview.
- Once you’ve found a template you like, click Insert.
Customize the Template:
- Once inserted, you can customize the template to suit your needs. You can:
- Edit text, images, buttons, or any other elements by clicking on them.
- Adjust the layout, spacing, and design using the Elementor sidebar options.
- Apply custom styles like colors, fonts, and more to match your website’s branding.
- Once inserted, you can customize the template to suit your needs. You can:
Save or Publish:
- After making your adjustments, click Update (if editing a live page) or Publish (for new pages) to apply the template.
Keywords: elementor blurry header, blur header CSS, elementor transparent header, elementor sticky header on scroll, elementor sticky header change logo on scroll, elementor sticky header change color on scroll, elementor blur background, how to create a blurred header, how to change header color in elementor, blur sticky header, sticky transparent header elementor, blur header elementor free, blur header elementor pro, blur header elementor download